Add-on Clothes (Create a DLC)
This tutorial is about adding new clothes slots into your server instead of replacing:
1. Download YMT Editor (Credits to grzybeek).
2. Download this files, this is an empty DLC.
3. Inside the folders there will be two of them named FEMALE and MALE, and inside there will be more categories of clothes, this is the meaning of each one.
Category meanings:
BERD: Masks
HAIR: Hair
UPPR: Upper Body/Hands
LOWR: Lower Body/Jeans
HAND: Bags & Parachutes
FEET: Shoes
TEEF: Scarfs & Chains
ACCS: Shirt & Accessory
TASK: Body Armor & Accessory
DECL: Badges & Logos
JBIB: Shirt Overlay & Jackets
4. To rename your clothes are you going to use the prefixes:
mp_f_freemode_01_ks <---- for FEMALE clothing
mp_m_freemode_01_ks <---- for MALE clothing
We are using this example:
You bought our Knotted Tee V1 This product its a shirt for female and contains 7 different color variations.
You should go inside KS_addon_clothes > stream > FEMALE > JBIB.
For a better sorting create a new folder named:
000- Knotted_Tee_V1 <---- We always start at 000 clothing number
Inside the folder add the 8 files and rename them like this:
mp_f_freemode_01_ks^jbib_000_u.ydd
mp_f_freemode_01_ks^jbib_diff_000_a_uni.ytd
mp_f_freemode_01_ks^jbib_diff_000_b_uni.ytd
mp_f_freemode_01_ks^jbib_diff_000_c_uni.ytd
mp_f_freemode_01_ks^jbib_diff_000_d_uni.ytd
mp_f_freemode_01_ks^jbib_diff_000_e_uni.ytd
mp_f_freemode_01_ks^jbib_diff_000_f_uni.ytd
mp_f_freemode_01_ks^jbib_diff_000_g_uni.ytd
* We suggest to add the .gif file just to remember which clothing is inside the folder.
* For a fastest automatic renaming we suggest to use this program:
5. Now open YMT Editor and go to File > Open (YMT) and open mp_f_freemode_01_ks.ymt
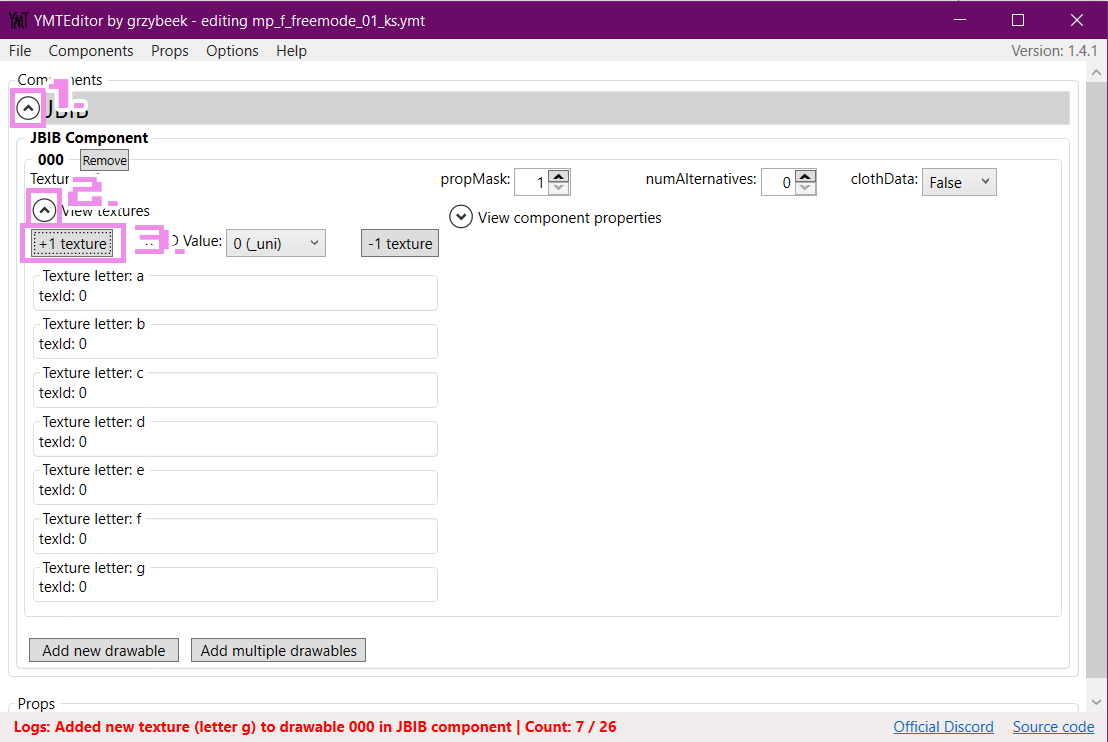
Go to Components > JBIB (Do this when you need to make a different category).
Now click in the arrow before the JBIB name on the list and then in View textures, click on +1 texture 7 times (depending on how much variation colors the clothing has).
6. Click on File > Save (YMT) and save as: mp_f_freemode_01_ks.ymt
7. When all files are ready drag and drop the folder named KS_addon_clothes to ".../resources/" in your server files.
8. In your server.cfg file add the line ensure KS_addon_clothes. You are done!
Exceptions
1. For reactive skin clothing files (ending in _r.ydd and _whi.ytd) always add Prop mask: 17
Renames should be like this:
mp_f_freemode_01_ks^lowr_000_r.ydd <---- r at the end of .ydd
mp_f_freemode_01_ks^lowr_diff_000_a_whi.ytd <---- whi at the end of .ytd
ㅤ
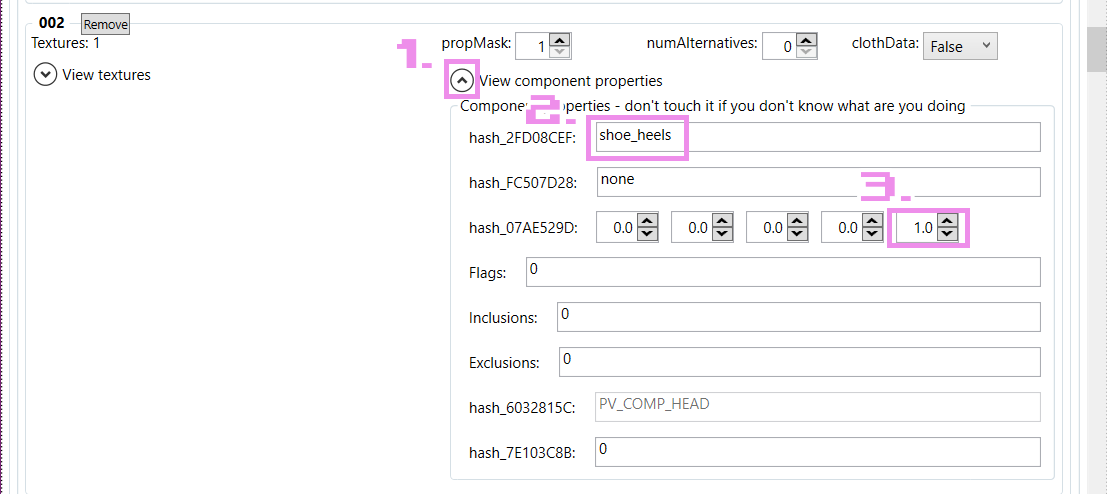
2. For heels open the arrow before View component properties and always add in Hash_2FD08CDF: shoe_heels and in the 5th value in Hash_07AE529D: 1.0.
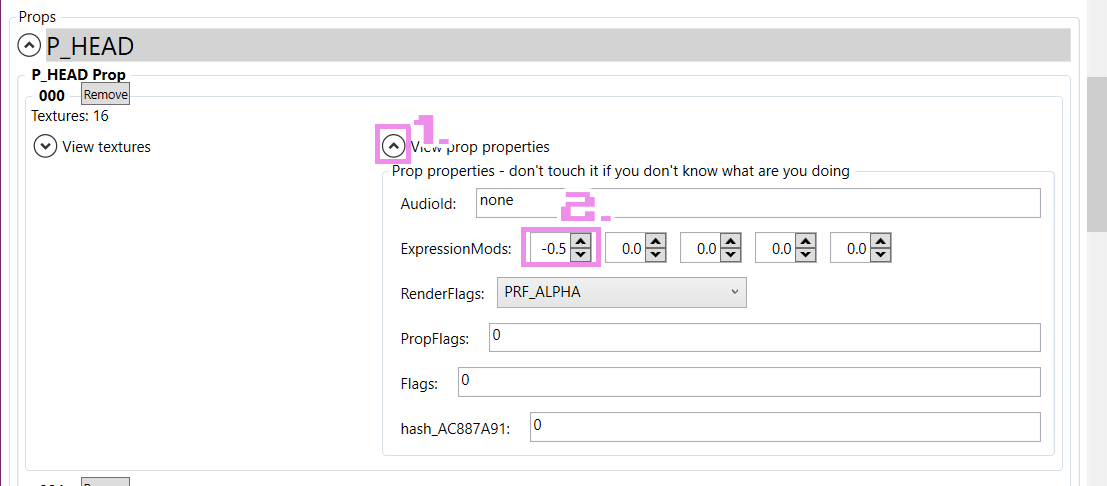
3. For most hats in p_head open the arrow before View prop properties and add in the first value of ExpressionMods: -0.5.
Renames should be like this:
mp_f_freemode_01_p_ks^p_head_000.ydd
mp_f_freemode_01_p_ks^p_head_diff_000_a.ytd
ㅤ
4. For 2. and 3. scenarios you need to generate a creature metadata, go to File > Generate CreatureMetadata and save in stream folder as:
mp_f_creaturemetadata_ks.ymt <---- for FEMALE clothing
mp_m_creaturemetadata_ks.ymt <---- for MALE clothing